

아두이노 보드 지그비 확장 보드 사용법
News/Events 2007. 10. 16. 15:10아누이노 지그비 보드는 지그비 통신을 사용가능하게 하는 보드이기도 하지만, 아두이노 초보 사용자에게 맞게 여러 가지 확장 기능을 제공하고 있다. 사디 인터랙션 디자인 랩에서 가장 아끼는 보드 디자인이다.
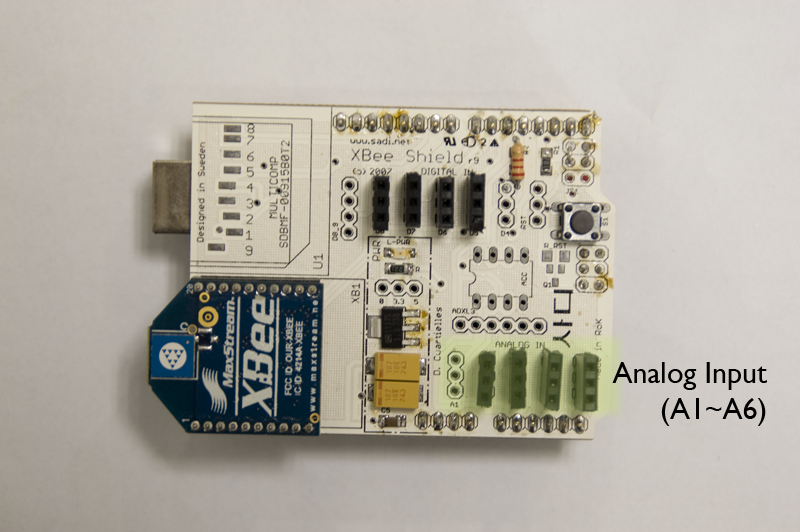
우선 아날로그 인풋을 쉽게 할 수 있도록 그룹핑시켜 놓았다.
예를 들어 가변저항과 같은 경우,
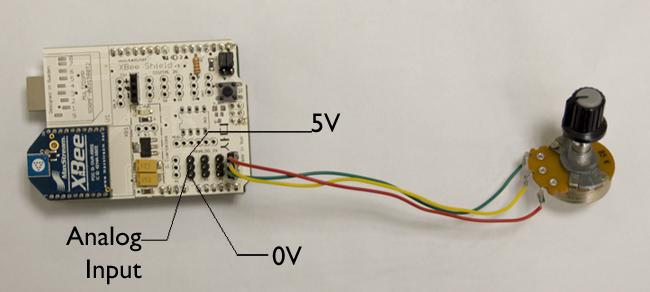
위 그림처럼 쉽게 사용할 수 있게 되어있다.
빛 센서나 열센서의 경우에는 다음과 같이 사용할 수 있게 되어있다.
 < 빛 센서의 경우 0 볼트와 아나로그 인풋 포트만 사용하면 된다. >
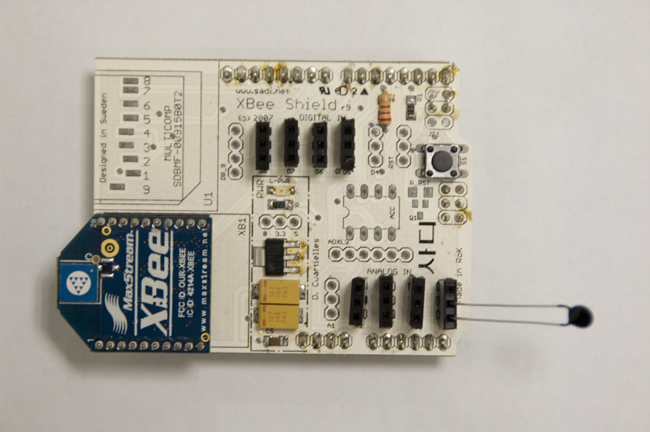
< 열 감지 센서의 경우도 마찬가지로 0 V 와 아나로그 인풋 포트만 사용하면 된다. >
아나로그 인풋 프로그램은 일반적으로 아래와 같이 테스트해볼 수 있다.
/*
* AnalogInput
* by DojoDave <http://www.0j0.org>
*
* Turns on and off a light emitting diode(LED) connected to digital
* pin 13. The amount of time the LED will be on and off depends on
* the value obtained by analogRead(). In the easiest case we connect
* a potentiometer to analog pin 2.
*
* http://www.arduino.cc/en/Tutorial/AnalogInput
*/
int potPin = 5; // select the input pin for the potentiometer
int ledPin = 13; // select the pin for the LED
int val = 0; // variable to store the value coming from the sensor
void setup() {
pinMode(ledPin, OUTPUT); // declare the ledPin as an OUTPUT
Serial.begin(9600);
}
void loop() {
val = analogRead(potPin); // read the value from the sensor
digitalWrite(ledPin, HIGH); // turn the ledPin on
delay(val); // stop the program for some time
digitalWrite(ledPin, LOW); // turn the ledPin off
delay(val); // stop the program for some time
Serial.println(val, DEC);
}
우선 아날로그 인풋을 쉽게 할 수 있도록 그룹핑시켜 놓았다.
예를 들어 가변저항과 같은 경우,
위 그림처럼 쉽게 사용할 수 있게 되어있다.
빛 센서나 열센서의 경우에는 다음과 같이 사용할 수 있게 되어있다.
< 열 감지 센서의 경우도 마찬가지로 0 V 와 아나로그 인풋 포트만 사용하면 된다. >
아나로그 인풋 프로그램은 일반적으로 아래와 같이 테스트해볼 수 있다.
/*
* AnalogInput
* by DojoDave <http://www.0j0.org>
*
* Turns on and off a light emitting diode(LED) connected to digital
* pin 13. The amount of time the LED will be on and off depends on
* the value obtained by analogRead(). In the easiest case we connect
* a potentiometer to analog pin 2.
*
* http://www.arduino.cc/en/Tutorial/AnalogInput
*/
int potPin = 5; // select the input pin for the potentiometer
int ledPin = 13; // select the pin for the LED
int val = 0; // variable to store the value coming from the sensor
void setup() {
pinMode(ledPin, OUTPUT); // declare the ledPin as an OUTPUT
Serial.begin(9600);
}
void loop() {
val = analogRead(potPin); // read the value from the sensor
digitalWrite(ledPin, HIGH); // turn the ledPin on
delay(val); // stop the program for some time
digitalWrite(ledPin, LOW); // turn the ledPin off
delay(val); // stop the program for some time
Serial.println(val, DEC);
}